So, finally now the tutorial about adjusting ornaments for upper and lower body part system clothes. I am sorry for the delay, but with the past holidays and RL move and SL work, my days got just too busy.
I hope the tutorial below is clear to understand, but I am of course open for new ideas or any kind of constructive criticism.
We start with the upper body template. As you can see I have the flowers in the front on an extra layer and as a complete ornament overlapping the template borders at the bottom. So now the only thing to do is to copy the flowers.....
… and paste them on the lower body part template in a new layer. Very important here is to resize them and make them smaller. This you have to do with all matching lower parts: resize it smaller(!)
Move them afterwards in position and save them as png to upload in-world and compare both parts.
As you can see there are still some small not matching issues. So back to Photoshop.
Grab the flowers again and resize them this time only at both sides. Afterwards go back in-world and upload it for a check. As for me it didn't fit, of course.
Take the Rectangular Marquee Tool and drag a square only on a small part of the left side of the flowers and resize this part only from the left to the right side.
And do exactly the same with a small part of the right side, just opposite. Don't forget to always recheck in-world.
To fit the middle part take again the Rectangular Marquee Tool and copy the non-matching part on a new layer. You might need to move it pixel for pixel till it fits in-world or even resize it a bit.
After you've finished and it fits in-world take the eraser, set it to brush and erase carefully the hard edges of this copied flower part. Then merge it with the original flower layer (merge down either over the layer menu above or right click on the layer and select it in the drop down menu).
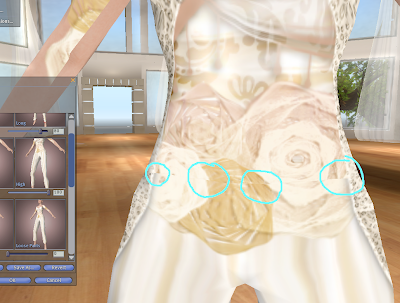
As you can see it now fits pretty nicely. However related to the highlighted sides its nearly impossible to fit it there 100% because....
...the upper body template is curved on the bottom and the lower body template is a straight line.
I may have to ask Einstein to give me the formula to force a perfect connection there ;) But if anybody has a solution for a perfect fitting I am more then happy to hear about it.
So the important parts of work are always:
- go with the ornament OVER the edges of the upper body template on an extra layer
- copy it and paste it on the lower part body and resize it as a whole to smaller
- resize relevant parts again
- you may even copy and paste some small parts, move it and resize it till it fits
- erase (brush) softly the edges of the copied parts
- merge everything when it fits
- please go ahead and experiment with it to your needs. All it takes is time and a back and forward in Photoshop and in-world
- if you want to also fit the sides (back and front) copy parts and mirror it
And here is the result as a complete dress.
I hope this was somehow helpful :)
Love and Respect,
LeeZu


It was very helpful, thank you!
ReplyDeleteב"ה
ReplyDeleteHi -- I'm a designer who's new to Second Life and I'm looking to find out:
1) How to take my ideas and make products (that is clothing, shoes, hats, handbags, etc) and create them as salable products on "Second Life"
2) How (and where) to market/sell them?
3) How to tie in "Second Life" to my real world creations?
4) How to protect my intellectual property from pilfering?
Thanks to everyone (my being a neophyte Second Lifer means I have tons to learn!)
Debbie
Please visit http://wiki.secondlife.com/wiki/Creation_Portal
ReplyDeleteYou should find all your answers there. Starting new in Second Life has alot of aspects to learn. And it takes time :)
Awesome dress LeeZu, as always excellent work :)
ReplyDeleteWarm regards from Oceane Grumiaux (Oceane Body Design)