Monday, 1 July 2013

Important Info-Material Viewer-LeeZu!


When using the Materials Viewer, it is mandatory if you want to see the materials to change your graphic settings.

Go to Preferances, then Graphics and click on Advanced Lighting Model. That way you will get the full effect of the new textures.

Monday, 10 December 2012

Textures blurry or not rezzing on rigged mesh 2

In the past, it happened that some of my rigged mesh releases somehow showed no texture or a blurry texture when worn. This happened to everyone, myself included. When I clicked the mesh and went to the texture tab, the clothing’s mesh texture would rezz. But, when I logged off and logged back in, the texture would be blurry again.

I work with Blender 2.49 and when I upload meshes into Second Life they are imported very tiny, (the size script is not working for me and I do not like the Interface of Blender 2.60). Some of the meshes that I did rezz and sized up manually inworld would have better working flow. Those I didn’t manually resize did not.

After some time, I figured that the texture rezz issue occurred only on the items that were not manually resized inworld from the tiny meshes. After I rezzed them, resized them, logged out and logged back inworld the texture was there. The problem was not only fixed for me but also the customers.

As it seems tiny mesh prims do have a serious texture problem.

LeeZu 

Wednesday, 26 September 2012

Textures On Mesh Clothing Not Rezzing

Greetings!

Are you having trouble seeing MESH textures? There is a bug with the viewer! We have a quick fix for you!!

Take the item from your inventory list and rezz onto the ground.

*** MAKE SURE THAT YOU ARE EITHER IN EDIT OR BUILD MODE WHEN REZZING MESH AS THEY CAN BE TINY AND HARD TO FIND ONCE REZZED.

Rezz all the sizes out on the ground. Wear your size. The texture should rezz.

Delete the extra copies.

Voila! Done!

Sunday, 14 November 2010

Sculpting for Beginners

 How to make a simple Pillow.

For my sculpties I use AC3D. Its a very simple but effective 3D program and you don't need to have Blender or Maya skills to handle it. You can download a trial version here www.inivis.com.


After the download open the program and you will see four different sections which will display your sculpt from each angle.


 What we do first is to Import one of the Second Life prims, that are included in the download. You will find it in the folder /Applications/ac3d/Models/Second Life. You will find there: Cylinder, Sphere and Subdcube. What we need now is the Subdcube.


 Here you can see it after the import. Each section displays a different side of the cube. I use only one window to work with. And that would be the one on the left bottom. To get into the full screen modus, click the small icon on the upper left of the window. (see orange arrows) You can switch back any time by pushing the space bar.


 This should be your screen afterwards. You can see that there are two sides on the top and the bottom that have in the center 4 points (Vertices). This should stay on the top and bottom (don't rotate) as we will need the plain sides to display the texture right. You can zoom via Command key (mac) and Ctrl key (PC) and rotate your view by also pushing the alt key. You need to handle these two keys to be able to move fast in the program and check all sides of the cube.


 Resize the cube now by activating the two buttons on the left upper corner (see orange arrows) and click the resize point in the center and drag it with your mouse to the left. (dont resize it from the top to the bottom!)


 Now activate the last of the four buttons on the left upper side of your screen (see orange arrow) and drag a square over half of the cube to activate the Vertices=blue small points.


 Turn your view to see the side of the cube and then click the Rotate button on the upper left side (see orange arrow) and rotate the upper half of the cube a bit to the left. If you make mistakes you can  go back with the Undo option in the Menu at any time: Edit->Undo. Keep the Vertices activated. If you lose them just drag a square again over them with the mouse.


 Now activate the Move button in the upper left corner (see orange arrow) and move the upper half of the cube a bit to the left to equate the resized sides.


 Turn your view now to see the front side of the cube and drag a square only around the Vertices seen above.


 Turn your view again and click and move the activated area to the left, to resize it only to the left side.


 Do the same now with the lower Vertices. As you can see, here it develops slowly into a pillow.


Click now only one Vertice to activate it and move it a bit inside the cube with the moving arrows.


 Now again drag a square over above shown Vertices and size them a bit to the right (or front) to refine the edge on the side.


Now activate the upper right corner of the cube (drag a square) and resize it on the sides to make the side smaller.


  Activate the three Vertices on the left side of the cube (dont drag a square here or you will also activate the Vertices on the back of the cube) and move them a bit inside the cube.


 Activate the left upper corner of the cube by dragging a square over them and move them up a bit.


Don't forget to save your project.


 Export the Pillow now as a Second Life Sculpted Prim. This will give out a rainbow texture in the TGA format. Export here means save it on your hard drive wherever you want it.


 Sign into Second Life and rezz a cube (or sphere) and upload the tga rainbow file. Go to the Object tab and click the drop down menu and click on Sculpted.

 Drag and drop your texture in the building window. Underneath you will see a drop down menu starting with Sphere. This displays the stitching type of the sculptie. It depends on the sculpt which stitching type you use. But for this pillow we will use Sphere.

Et Voila! You can texture the pillows now as you like. To specify the pillows with the appropriate shadow and light settings you can use the abc template, which you can download below (right click and save on your hardrive):


Texture your pillow with this template to see the guidelines and open this template in your photo program (whichever you use) not necessarily Photoshop and work your texture through the guidelines.
Another possibility is of course to texture it in Photoshop CS4, which has the ability to import 3D objects and paint directly on them. But that would be another tutorial.

Please experiment as much as you can with the AC3D program. The more you do, the more you will understand it.

Happy sculpting!

Love and Peace
LeeZu

Friday, 19 February 2010

How to fit textures with ornaments for upper and lower body

So, finally now the tutorial about adjusting ornaments for upper and lower body part system clothes. I am sorry for the delay, but with the past holidays and RL move and SL work, my days got just too busy.

I hope the tutorial below is clear to understand, but I am of course open for new ideas or any kind of constructive criticism.


We start with the upper body template. As you can see I have the flowers in the front on an extra layer and as a complete ornament overlapping the template borders at the bottom. So now the only thing to do is to copy the flowers.....


… and paste them on the lower body part template in a new layer. Very important here is to resize them and make them smaller. This you have to do with all matching lower parts: resize it smaller(!)
Move them afterwards in position and save them as png to upload in-world and compare both parts.

  
As you can see there are still some small not matching issues. So back to Photoshop.

 
Grab the flowers again and resize them this time only at both sides. Afterwards go back in-world and upload it for a check. As for me it didn't fit, of course.


Take the Rectangular Marquee Tool and drag a square only on a small part of the left side of the flowers and resize this part only from the left to the right side.

  
And do exactly the same with a small part of the right side, just opposite. Don't forget to always recheck in-world.

  
To fit the middle part take again the Rectangular Marquee Tool and copy the non-matching part on a new layer. You might need to move it pixel for pixel till it fits in-world or even resize it a bit.

  
After you've finished and it fits in-world take the eraser, set it to brush and erase carefully the hard edges of this copied flower part. Then merge it with the original flower layer (merge down either over the layer menu above or right click on the layer and select it in the drop down menu).


As you can see it now fits pretty nicely. However related to the highlighted sides its nearly impossible to fit it there 100% because....

  
...the upper body template is curved on the bottom and the lower body template is a straight line.
I may have to ask Einstein to give me the formula to force a perfect connection there ;) But if anybody has a solution for a perfect fitting I am more then happy to hear about it.


So the important parts of work are always:

- go with the ornament OVER the edges of the upper body template on an extra layer
- copy it and paste it on the lower part body and resize it as a whole to smaller
- resize relevant parts again
- you may even copy and paste some small parts, move it and resize it till it fits
- erase (brush) softly the edges of the copied parts
- merge everything when it fits
- please go ahead and experiment with it to your needs. All it takes is time and a back and forward in Photoshop and in-world
- if you want to also fit the sides (back and front) copy parts and mirror it


And here is the result as a complete dress.

I hope this was somehow helpful :)


Love and Respect,
LeeZu 


Sunday, 2 August 2009

How to make a tiny sphere


This tutorial is good for making tiny jewellery or to add some tiny sphere accessories to it. I will try to explain clearly step by step in the hope that this tutorial will also help people that are not yet very familiar with the building option in Second Life. It is, of course also for all the people that struggle with the question: how on earth can I make a sphere smaller without using sculpties?

For those who are not yet familiar with building in Second Life, my recommendation is to visit inworld schools and classes that are teaching from the very basics of building to more complicated buildings. When I started in Second Life I visited a lot of building classes and they helped me not only learn how to build but they also gave me a deeper look into tricks and tips. You can find building classes via places and education search inworld and you can visit the Ivory Tower Library of Primitives.


First of all rez a sphere....(click the Building button, choose sphere and click in front of you on the floor)...


...then click in the building window the square building button (1) next to the square rez button to get the position arrows, go to the Object tab (2) in the center of the building window and set the size (3) of the sphere to
x = 0.010
y = 0.010
z = 0.010
As you will see you cant go lower than this size. For example you can‘t add 0.005 here. It will always change back to 0.010 lowest size.


Here is your sphere now zoomed. What you should do now is to set Hollow to 30.0


And now cut out half of the sphere by adding the number 0.500 in the „Patch Cut Begin and End“ Box B. It is anyway in which box (B or E) you paste the number, or which site you cut because this cut is just temporary, being able to work on the inside of the sphere, and we will close it again in the end.


It is important now to click the radio button „Select Texture“ (1) and click on the sphere parts where i drew the turquoise arrows and add a transparent texture to it by clicking the Texture Tab (2) and then the Texture box (3). The transparent texture you can get here:

Just click into the center of the empty space above and save the graphic onto your harddrive for uploading later. (lol...i know that looks wierd now)

So in the end you see only the plain SL texture in the middle part of the sphere. Now click on this middle part (red arrow) and attach a texture as described above from your choice.


I took a metallic texture and added some shininess to it (which you can adjust also in the Texture tab). Afterwards go back to the Position arrows and the Objects tab and close the cut by setting B to 0.000 (E would be 1.000) again in the „Patch Cut Begin and End“ box. Then close the Bulding Menu.


And that‘s it! :D

You can make the sphere even more tiny by adjusting the number in the „Hollow“ box. As you can see, the last sphere is hollowed to 20.0. You can play around with this number until the size fits to your needs.


And here you have the final result. Tiny spheres connected to make a complete set.

For the next tutorial I received a request to show how to adjust two textures with ornaments on it on upper and lower body, to have a matching connection between upper body part clothing and down part clothing. However, please don‘t hesitate to comment on what you would like to be covered, so that I have some kind of exchange and direction and if this tutorial was of some kind of help. Thank you!

Love and Respect,
LeeZu

Saturday, 13 June 2009

The making of Noell Top Texture

I am really happy to finally get to manage my first tutorial. I actually wanted to do this much earlier, but was kept busy with other things. But now it's here, and i will try to update it frequently.

The bad news though, is that I work with my Photoshop CS in German, so i am not sure if it will recognize the english word for specific tools. For this reason, I have highlighted (transparent turquoise) the tools I have used. Please click on the pictures to enlarge them for a better view.

This is a tutorial for people who are already familiar with using Photoshop or already have the basic skills for it, but also for people who are just curious and interested.

First of all, I am using the Robinwood Templates for my system clothing design in Second Life, which you can get here .

The texture tutorial below is developed on a 512x512 pixel texture, as it doesn't have many philigran cuts or accessories. However, I do recommend that you download the 1024x1024 pixel templates also if you want to work on more complicated cuts or details.

So lets get started:
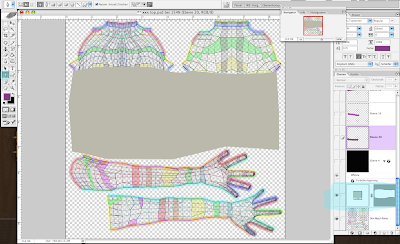
The very first thing I do is to use the pen tool to draw my cut on the template. This tool is very handy to outline shapes in a very clear and sober way. You will find a youtube tutorial on how to use this pen tool in the sidebar links.
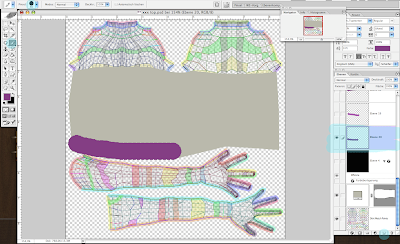

Afterwards I added a new layer and chose the pencil tool to draw the lines of the texture I had in mind for this dress.
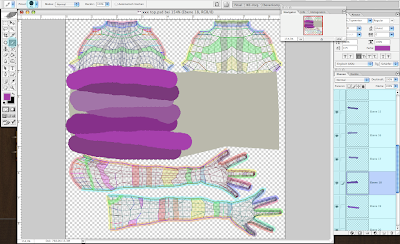

As I had a "wrapped around the body" shirt in mind, I opened a new layer for each stroke, so as to not have the edges of the lines going over each other, and to layer each stroke under the other one. At the end I just combined all stripe layers into one layer.
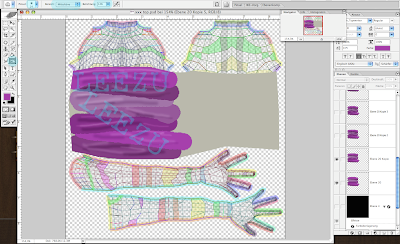


The next step was to add the wrinkles to the "garment" by using the Dodge and Burn Tool. You can experiment with the thickness of this tool or highlights, midtones, darktones and the strength of the result. For drawing the wrinkles I stayed in the midtones, but changed my brushsize in between. I always find it hard to discover the right wrinkles and draw them right. So its always better to take time to experiment with this.
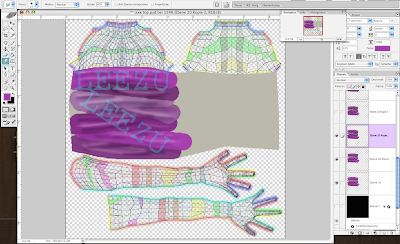


Once I was satisfied with the rough draft of the wrinkles, I used the smudge tool to make all the lines smoother and give it a bit more of a homogenous (less distressed) feeling.
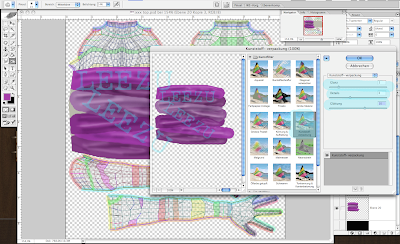


A trick now is to open the filters menu in the main menu above and use the Plastic Wrap Filter and to adjust the sliders to your needs.
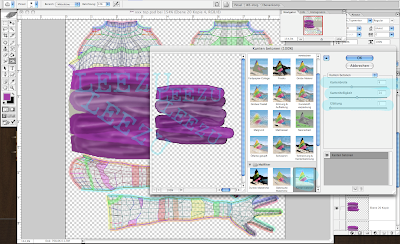


Then open the filters menu again to add the Highlight Edges Filter. This gives the edges a deeper, 3 dimensional look. Not much but enough to make a difference.
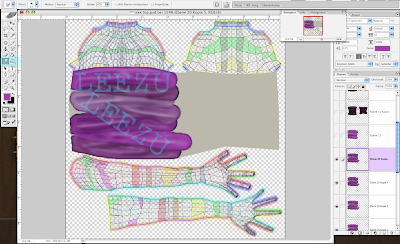


After this, I went back to the smudge tool to paint everything a bit smoother and used the dodge and burn tool again to finalize the wrinkles.
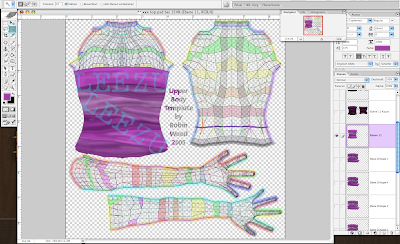


After adjusting the main color, I cut out the sides to have the right look on the shape and borders.
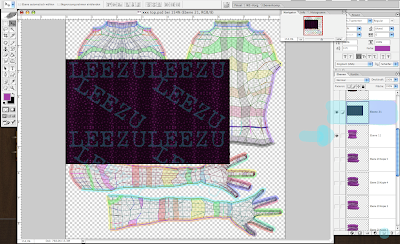


Then I opened a texture I had already prepared for the Berlin skirts and copied and pasted it into my top template...
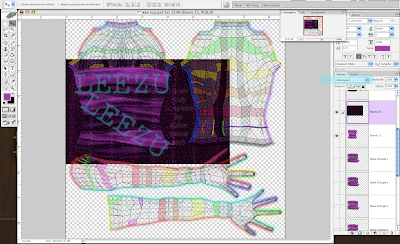


... and set the whole layer via drop down menu to overlay.
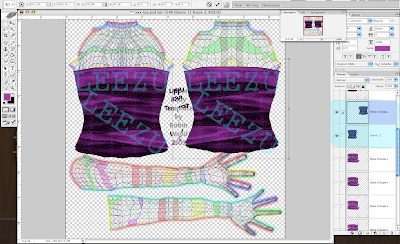


I cut out the unnecessary part and combined both layers into one. I copied the texture and mirrored it horizontal for the back side. Of course this is silly if you want to have the back look different than the front, but for this draped shape look it works. But dont forget to mirror it before you adjust it. It's Important now to resize the back side a bit to have matching sides in Second Life. This can be tricky and cost some uploads till you get it right but sides should match in my opinion or it looks unfinished.
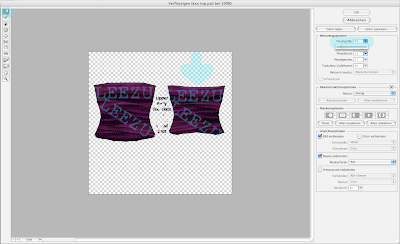


Then i adjusted the colors again to fit it to my original idea. Since I wanted the top back part to come down a bit, I opened the liquify window (also under Filter Main menu) and moved the top back part a bit lower till it fit.
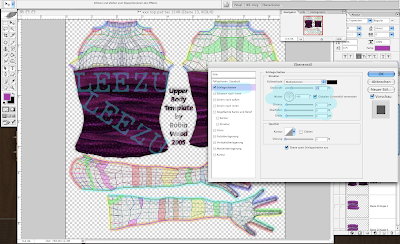


Now I double the layer and select the layer below (not the doubled one) and open the (layerstyle) menu through double clicking the layer to add shadow to the top. This makes the system clothes look a bit more natural on the Av and it doesn't look like it's painted on.

There are other ways to add shadows, especially for complicated cuts or if the edges of the textures and shadows don't fit together, but that would be another tutorial. For this simple cut it's enough to go through this menu.

After I adjusted the shadow through the sliders to my satisfaction I opened a new layer (empty) underneath the layer with the shadowed texture and combined both. The effect of this step is that the shadow is now attached to the texture and I can erase parts of it when i see inworld that the edges don't fit to each other. I couldnt do that if the filter was still active through the (layerstyle menu).

Also I doubled the layer to avoid having the shadow attached on my origianl texture because later if I change colors I would also change the color of the shadow, which I wouldn't want. So shadows please should always be as an extra layer.
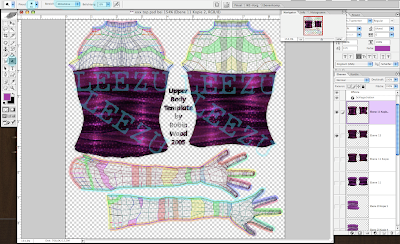


To finalize the garment I returned to the dodge and burn tool and highlighted and darkened both parts with a thicker brushstyle.
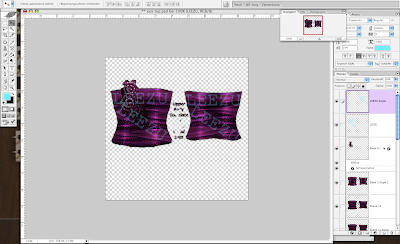


To complete everything regarding the final dress style i added an accessory to it.
Now uncheck all other layers (exept the original and the shadow one) and save this file as a png file.
(in earlier times it was tga which was a bit more complicated to finalize the shadow effect to, and err since when do they have the png choice actually? i just discoverd it a few weeks ago but maybe i am blind^^)

And here is the result of the finished dress inworld:


For the lighter flower overlayers seen on the sculpted prims I used a texture which i prepared weeks ago in Illustrator CS as a vector graphic to use for an upcomming release and overlayed it on the basic texture in Photoshop.

One thing while working on this texture is of course always going back and forth in Second Life and Photoshop to adjust everything right. A tip to save all the upload money is to download the Mono grid and work there. Its a beta grid which is not connected to the main Second Life grid and therefore Linden Lab adjusted the account balance to already 40k I think (which you of course cant transfer...lol) but you can pay the uploads from this money and adjust everything on the monogrid and later you just have to log into the main viewer and upload the final texture.

If you have any questions please don't hesitate to ask them via the comments and i will try to answer them. Also of course I am always open for tips and tricks or any input on what kind of tutorial you would like to see. So please comment as I check this site frequently.

Sidenote: I reserve the right to delete any rude or unrelated comments.

Love and Respect,
LeeZu